Showing posts with label Tips and Tricks. Show all posts

How to Remove A Mailbox in Exchange 2010 With One or More Mailboxes Error

If you're encountering the following error even after you have removed all the user account mailboxes , then you need to follow the solution steps below. Please note that the solution below is not for removing the last database on your Exchange 2010.

Error:

This mailbox database contains one or more mailboxes, mailbox plans, archive mailboxes, or arbitration mailboxes. To get a list of all mailboxes in this database, run the command Get-Mailbox -Database <Database ID>. To get a list of all mailbox plans in this database, run the command Get-MailboxPlan. To get a list of archive mailboxes in this database, run the command Get-Mailbox -Database <Database ID> -Archive. To get a list of all arbitration mailboxes in this database, run the command Get-Mailbox -Database <Database ID> -Arbitration. To disable a non-arbitration mailbox so that you can delete the mailbox database, run the command Disable-Mailbox <Mailbox ID>. To disable an archive mailbox so you can delete the mailbox database, run the command Disable-Mailbox <Mailbox ID> -Archive. Arbitration mailboxes should be moved to another server; to do this, run the command New-MoveRequest <parameters>. If this is the last server in the organization, run the command Disable-Mailbox <Mailbox ID> -ArbitrationDisableLastArbitrationMailboxAllowed to disable the arbitration mailbox. Mailbox plans should be moved to another server; to do this, run the command Set-MailboxPlan <MailboxPlan ID> -Database <Database ID>.


Solutions:

  1. Launch Exchange Management Shell
  2. Check for user account mailbox Archive with this command,
 Get-Mailbox | where {$_.ArchiveDatabase -eq "Your Database"}

if there is any user account is still using the intended database to be removed with Archive enabled, then you need to move it to another database first.

Once you determined there are no more user mailboxes using the the database to be removed then follow these next steps.

  1. Check for Soft Deleted mailboxes by running this command
 Get-mailboxstatistics -database "Your Database" |fl

This will list all the mailboxes that are disconnected from the database and labeled as SoftDeleted. If it shows a list of the mailboxes in SoftDeleted then run the next command, otherwise you can skip it.

      2. To permanently delete all SoftDeleted mailboxes, run this command

Get-MailboxStatistics -Database "Your Database" | where {$_.DisconnectReason -eq "SoftDeleted"} | foreach {Remove-StoreMailbox -Database $_.database -Identity $_.mailboxguid -MailboxState SoftDeleted}

Unfortunately, you will have to acknowledge each of the mailboxes to be permanently deleted from the database. Once all the SoftDeleted mailboxes are confirmed, you need to follow the next step.

      3. Check for mailbox Arbitration with this command


Get-Mailbox -Database 'Your Database'-Arbitration

It should list the Arbitration mailboxes that contributed to the initial error. You will need to move them to another database with these next steps.

     4. Set-AdServerSettings -ViewEntireForest $True

     5. Get-mailbox –Arbitration –Database "Your Database"| new-MoveRequest –targetdatabase "Your Other Database"

     6. Get-moverequest

It will display whether the move request has been completed.

    7. Get-moverequest | Remove-moverequest

    8. Remove-mailboxdatabase –identity "Your Databse"


Connect to Exchange Online Using Remote PowerShell

Remote Power Shell allows you to connect to your Exchange Online (Office 365) to manage your settings. It’s a simple four-step process.

1. On your local computer, open Windows PowerShell with elevated permission (Run as administrator) and run the following command.

           
    $UserCredential = Get-Credential

    In the Windows PowerShell Credential Request dialog box, type your Exchange Online user name and password, and then click OK.


2. Then run the following command.

     $Session = New-PSSession -ConfigurationName Microsoft.Exchange -ConnectionUri https://outlook.office365.com/powershell-liveid/ -Credential $UserCredential -Authentication Basic -AllowRedirection

3. Next, run the following command.

    Set-ExecutionPolicy RemoteSigned

Select YES


4. Run the next command.

     Import-PSSession $Session


To disconnect your session, run 

Remove-PSSession $Session

How to Resize VirtualBox Disk Image in Windows

The procedure to resize or expand VirtualBox disk image (VDI) in Windows will take the following steps:

1. Backup your VDI disk image
2. Run elevated privilege Command Prompt
3. Change the directory to where your VirtualBox is installed. It usually located on C:\Program Files\Oracle\VirtualBox\
4. Run this command, VboxManage.exe modifyhd "YOUR_HARD_DISK.vdi" --resize SIZE_IN_MB

Example: C:\Program Files\Oracle\VirtualBox\VboxManage.exe modifyhd "C:\Users\Vootwerk\VirtualBox VMs\Windows 8 Enterprise\Windows 8 Enterprise.vdi" --resize 40960

5. Once VDI disk image is resize, you will then need to extend the partition on your Windows VM to use the newly unallocated disk space.

How to Fix Missing Metro IE in Windows 8

If you installed other Internet browsers in your Windows 8 and set it as default browser, your Windows 8 will automatically replaces Internet Explorer Metro with the desktop version of Internet Explorer 10 in your Start Screen. To fix this issue, you just simply need to set Internet Explorer as your default browser in your Windows 8.


  1. In your Metro, press the Windows key on your keyboard to go to Desktop or click Desktop in Metro
  2. Launch your Internet Explorer 
  3. Select Tools then Internet Options 
  4. Click on the Programs tab and click on Set associations button
  5. Check the Select All option then click on the Save button
If the above steps did not fix your Metro IE, then you just need to set Internet Explorer as your default web browser.

  1. Press your Windows key and X then select Control Panel 
  2. Select Default Programs then Set program access and computer defaults

"The message has a digital signature, but it was not validated" Error Message in OWA

Outlook Web App (OWA) does not provide support for digital certificates because it does not include support for S/MIME. If you received an email message that included digital signature, you may see "The message has a digital signature, but it was not validated" error.

To resolve this problem, you can follow these steps:


 1. Click Start, click Run, type Regedit, and then click OK.

2. Locate and then click the following registry subkey:

HKEY_LOCAL_MACHINE\SYSTEM\CurrentControlSet\Services\MSExchangeWEB\OWA

3. On the Edit menu, point to New, and then click DWORD Value.

4. Type CheckEmbeddedSmime, and then press ENTER.

5. Right-click CheckEmbeddedSmime, and then click Modify.

6. In the Edit DWORD Value dialog box, under Base, click Decimal.

7. In the Value data box, type 1, and then click OK.

8. Exit Registry Editor.

"This operation has been cancelled due to restrictions in effect" When Click Link in Outlook Solution #2

The following is another alternative solution when you're receiving error of "This operation has been cancelled due to restriction in effect on this computer" upon clicking hyperlink in your Outlook.


  1. Close your Outlook and any opened browsers in your desktop
  2. Go to elevated Command Prompt (right click "Run as Administrator")
  3. Type in the following Registry Keys in your Command Prompt
REG ADD HKEY_CURRENT_USER\Software\Classes\.htm /ve /d htmlfile /f
REG ADD HKEY_CURRENT_USER\Software\Classes\.html /ve /d htmlfile /f
REG ADD HKEY_CURRENT_USER\Software\Classes\.shtml /ve /d htmlfile /f
REG ADD HKEY_CURRENT_USER\Software\Classes\.xht /ve /d htmlfile /f
REG ADD HKEY_CURRENT_USER\Software\Classes\.xhtml /ve /d htmlfile /f


  4. Launch your Outlook then try to click on the hyperlink

Windows 8 Find Applications Shortcut

To find all your applications in Windows 8, you either,

1. Right click anywhere Start Screen and select All Apps

or

2. Press Windows key and Q at the same time


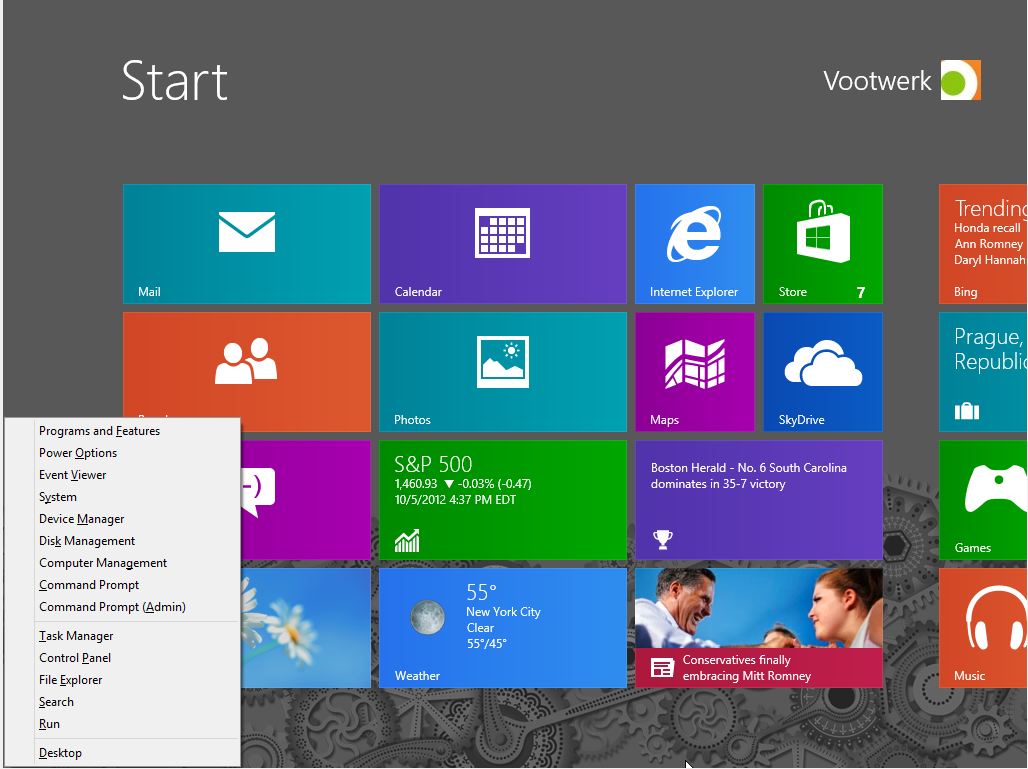
Windows 8 Start Menu Short Cut

Basic Start Menu in Windows 8 can be accessed by hovering your mouse to the bottom left corner of your screen in Desktop menu and then right click. It can also be accessed by swiping form the rights side of a touch screen.

The shortcut for basic Start Menu is by pressing your Windows key and X key at the same time.


How to Reset Symantec Endpoint Protection Manager Password

You can reset your Symantec Endpoint Protection Manager password by using its resetpass.bat located in your installation directory. The tools is provided with the installation package. If you are unable to find resetpass.bat, your Symantec Endpoint Protection maybe installed on another drive.

To reset the password follow these steps:

  1. On the server where your installed Symantec Endpoint Protection, open the following directory C:\Program Files\Symantec\Symantec Endpoint Protection Manager\Tools or C:\Program Files (86)\Symantec\Symantec Endpoint Protection Manager\Tools
  2.  Double click resetpass.bat and the password will be reset to default credential
  3. Open your Symantec Endpoint Protection Manager
  4. Logon using Admin for both username and password
  5. Be sure to change the password after your successfully login
 Please note: if your account is locked, you may have to wait 15 to 60 minutes before you can try to use resetpass.bat.

How to Search Email Address in Active Directory

Once in a while when you try to assign a new email address to a user account, you encountered a specific email address you would like to assign has been taken. In a small Active Directory environment, the task to find an email address is easy, but if what if your environment consisted of thousands of accounts?

Here is the simplest way to find an email address that has already been assigned to a user account.

1. Go to Active Directory User Computer
2. Right click your Domain and select Find
3. Under the drop down menu of Find, select Custom Search
4. Under the drop down menu of In, select Entire Directory
5. Click on the Advanced tab, then type

proxyaddresses=smtp:emailaddress@yourcompany.com 

Note: change 'emailaddress' with email address you'd try to search and replace 'yourcompany.com' with your domain.


How to Add Internet Search in Windows 7 Start Menu

In Windows 7 you can enable default Internet search function of your default browser in Start Menu.

1. Run GPEDIT.MSC from Search programs and files box
2. Go to User Configuration then select Administrative Templates
3. Double click Start Menu and Taskbar
4. On the right pane, edit Add Search Internet link to Start Menu
5. Select Enable then click Apply


How to Fix Incorrect Time in Windows 2008 Domain Controller

Here is the command line to fix computer time synchronizing problem in Windows 2008 Server.

1. Go to Command Line with Administrator privilege
2. Type the following command w32tm /config /syncfromflags:manual /manualpeerlist:pool.ntp.org
3. Then w32tm /config /reliable:yes
4. w32tm /config /update
5. w32tm /resync
6. net stop w32time
7. net start w32time

"This operation has been cancelled due to restrictions in effect" When Click Link in Outlook

When clicking on a hyperlink in Outlook, you get this message : "This operation has been cancelled due to restrictions in effect on this computer." and your Windows 7 or Vista computer has just uninstalled Google Chrome. Uninstalling Google Chrome does not remove the registry value of HTM/HTML association key. The following steps will fix the error.


STEP 1: Set Internet Explorer as your default program

1. Go to Default Programs from your Menu
2. Select Set your default programs
3. Click on Internet Explorer on the left hand side
4. Then click on Set this program as default

STEP 2: Restoring HTM/HTML registry key

1. Type Regedit in Search programs and files
2. Expand HKEY_CURRENT_USER\Software\Classes\.html
3. Right click on the value of the .html and select Modify
4. Change the value from ChromeHTML to htmlfile
5. Click OK to accept it.

How to Disable or Enable UAC with Command Line

There is a quick way to disable Windows 7 or Windows Vista UAC by using command line.

To Disable UAC:

C:\Windows\System32\cmd.exe /k %windir%\System32\reg.exe ADD HKLM\SOFTWARE\Microsoft\Windows\CurrentVersion\Policies\System /v EnableLUA /t REG_DWORD /d 0 /f

To Enable UAC:

C:\Windows\System32\cmd.exe /k %windir%\System32\reg.exe ADD HKLM\SOFTWARE\Microsoft\Windows\CurrentVersion\Policies\System /v EnableLUA /t REG_DWORD /d 1 /f


How to Remove Thumb.db File in Windows XP

Thumb.db file is created by Windows for folders that contain pictures. It caches a thumbnail version of the pictures within the folder in order to view the thumbnail images faster each time the folder is opened. To remove thumb.db from being created, follow these steps:

1. Open the image folder
2. Select View then Folder Options from the menu
3. Click the View tab
4. Check the Do not cache thumbnails option
5. Click Apply to All Folders and close the window.


How to Fix Show Hidden Files and Folders

If you encountered a problem to display hidden files and folders after you enabled it, you need to edit your registry settings below. You need to back up your registry setting before re-editing it.

1. Go to Run (Windows XP) or Search programs and files for Windows 7
2. Type regedit
3. Go to HKEY_CURRENT_USER\Software\Microsoft\Windows\Current Version\Explorer\Advanced
4. Replace the Hidden Reg_DWORD key to 1

How to Reset Foundry FastIron Edge X448 to Factory Default

The following are the steps to reset your Foundry FastIron Edge X448 to its factory default settings.

1. You need to unplug the power cords from switch.
2. Plug the power cords back and immediately type "b" key on your console. This will pause the boot process of the switch.
3. Type the following command:

FESX448> no password
FESX448> boot system flash primary

4. Your Foundry FastIron Edge X448 switch will reboot without prompting for a password. At the opening CLI prompt, enter the following enable command:

FESX448> enable

5. After enabling, you need to enter the following command, which it will erasing all of your Foundry FastIron Edge X448 configuration. 

FESX448# erase start
FESX448# reload

How to Set Management Privilege Password for Foundry FastIron Edge X448

You can setup a single password for each of the management level of Foundry FastIron Edge X448 switch. The following are the management privilege levels:

• Super User level – Allows complete read-and-write access to the system. This is generally for system administrators and is the only management privilege level that allows you to configure passwords.
• Port Configuration level – Allows read-and-write access for specific ports but not for global (system-wide) parameters.
• Read Only level – Allows access to the Privileged EXEC mode and CONFIG mode of the CLI but only with read access.

You must use the CLI to assign a password for management privilege levels. You cannot assign a password using the Web management interface. The following steps are to configure passwords for management privilege levels:

1. At the opening CLI prompt, enter the following enable command:

FESX448> enable

2. Access the configuration level of the CLI by entering the following command:

FESX448# configure terminal
FESX448(config)#

3. Enter the following command to set the Super User level password:

FESX448# enable super-user-password (type your password here)

4. Enter the following command to set the Port Configuration and Read Only level passwords:
  
FESX448# enable port-config-password (type your password here)
FESX448# enable read-only-password (type your password here)

5. Enter the following command to save it:

FESX448(config)# write mem

How to Allow Local User Accessing Foundry FastIron Edge X448 Web Interface

After you created a unique IP address for your Foundry FastIron Edge X448 switch, you may want to allow local users to access its Web Interface for GUI management. You can follow these simple steps to configure it.

1. At the opening CLI prompt, enter the following enable command:

FESX448> enable

2. Access the configuration level of the CLI by entering the following command:

FESX448# configure terminal
FESX448(config)#

3. Add these two command lines to grant access for local users to Foundry FastIron Edge X448 Web Interface:

FESX448(config)# aaa authentication web-server default local

FESX448(config)# aaa authentication login default local

4. Save the configuration changes to the device's flash memory:

FESX448(config)# write mem 

How to Create Local User Account For Foundry FastIron Edge X448

In order to create local user account for your Foundry FastIron Edge X448 switch, you must logged on with super-user access.

1. At the opening CLI prompt, enter the following enable command:

FESX448> enable

2. Access the configuration level of the CLI by entering the following command:

FESX448# configure terminal
FESX448(config)#

3. To create local user account, enter the following command:

FESX448(config)# username john privilege 0 password j4n3d03


In this example, username john will have full access to all configuration and display features. His password will automatically be encrypted unlike the previous software version whereas you have a choice.

FESX448(config)# username bob privilege 5 password b1gb0y


In this example, username bob will have read-only level to all configuration and display features. Bob can look for the information but cannot make configuration changes.

FESX448(config)# username jack nopassword


In this example, username jack will have a super user account with no password. Jack will have full access to all configuration and display features.

The privilege parameter specifies the following:

  • 0 - Full Access (super-user)
  • 4 - Port-configuration access
  • 5 - Read-only access
The default privilege level is 0. If you want to assign Super User level access to the account, you can enter the command without privilege 0.

4. Save the configuration changes to the device's flash memory:

FESX448(config)# write mem